https://services.glpi-network.com/documentation/1565/file/README.md
If you’ve ever wanted to give your GLPI instance a unique touch by incorporating your logo and customizing the login page, you’re in for a treat. In this blog post and accompanying video tutorial, let’s walk through the first steps of using the Branding Plugin to elevate your GLPI experience — and your client’s too.
The Branding Plugin for GLPI is a powerful tool designed to enhance the visual appeal of your GLPI instance. It allows you to replace default logos with your own and create a more personalized login page without the need of copying and pasting files directly into the server’s folders.
This not only makes your GLPI instance visually distinctive, but also reinforces your organization’s brand identity.
ℹ️ The ‘Branding’ plugin is available for all the Basic GLPI Network subscribers and for all GLPI Network Cloud customers.
How to install the Branding Plugin
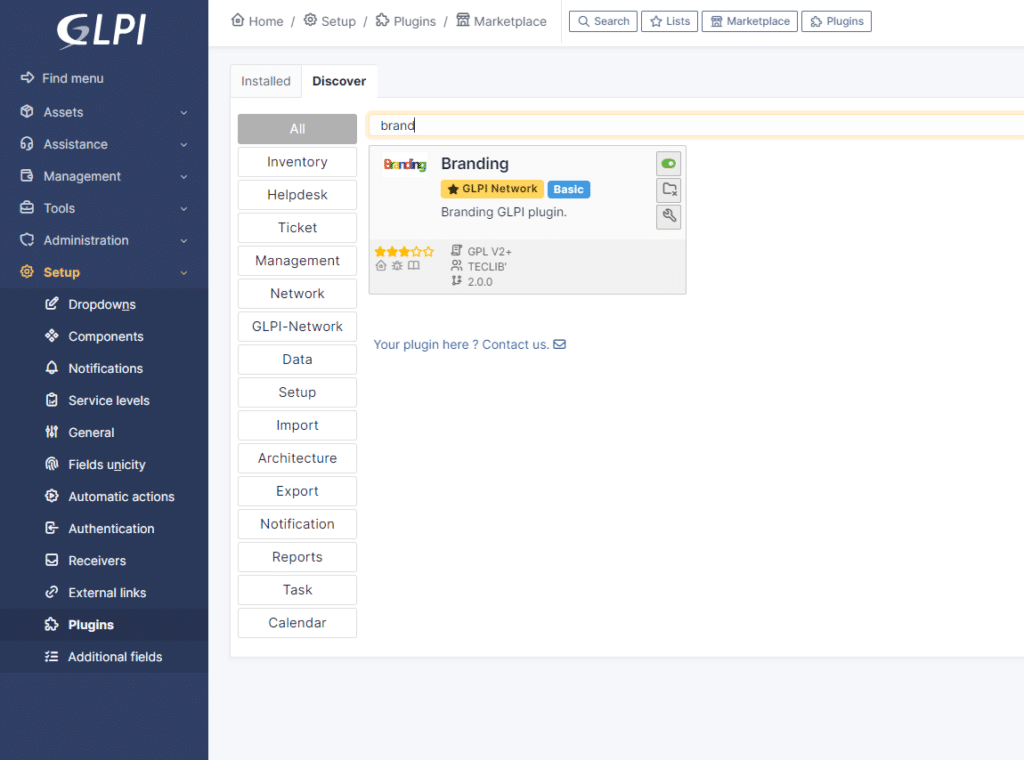
If you are, at least, a Basic GLPI Network Subscriber or a GLPI Cloud Network administrator, you can find the plugin named Branding on the Marketplace of your instance.
✅ The plugin is available for all Basic or above GLPI Network Subscribers and for all GLPI Network Cloud clients.
Step 1: In Setup > Plugins > Marketplace, search for Branding after choosing the Discover tab.
Step 2: Install and enable it.

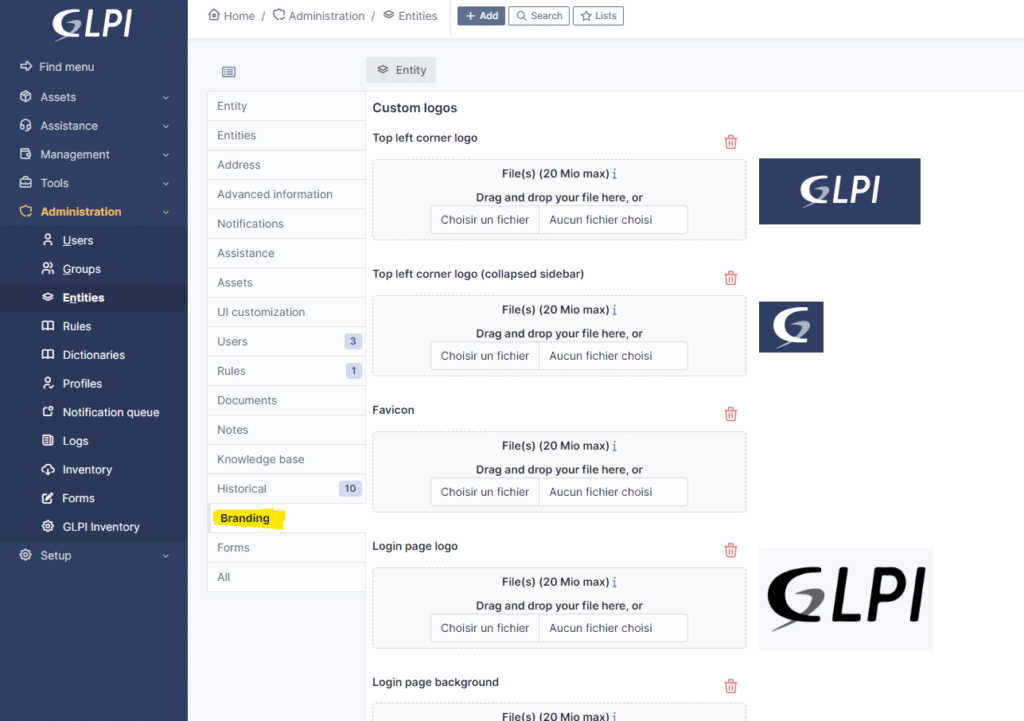
Step 3: Click on the tool icon below the Uninstall button or navigate through Administration > Entities > Root entity and look for the Branding tab

How to change GLPI login and top left logos
Step 4: Choose the files you want to replace the current ones.
- Top Left corner logo – This can be changed according to the desired entity
- Default size: 100×55 pixels
- It is the logo you see when your GLPI page is opened and the left sidebar is expanded.
- Lop Left corner logo (collapsed sidebar) – This can be changed according to the desired entity
- Default size 40×40 pixels
- It is the logo you see when your GLPI page is opened and the left sidebar is collapsed.
- Favicon
- Default size: 16×16 or 32×32 pixels
- It is the logo you see next to the page title at the beginning of your browser’s the tab.
- Login page logo
- Default size: 220×130 pixels
- It is the logo you see before you log in. It appears with the fields to fill with your username and password
- Login page background
- Default size: It depends on the usual size of your screens. The bigger, the better. (Make sure not to surpass the maximum upload limit for files.
- It is the image you can add as a background at the login page.
Getting Started
Getting started with “Branding” is easy. You’ll find detailed documentation here: Plugin Documentation. Plus, you can explore this plugin in action on your GLPI Network Cloud demo instance.
This plugin is available via our professional offers ! From the level “Basic” in GLPI Network Subscriptions (on-premise), and to all of our GLPI Network Cloud customers.
Subscription and More Information
Find all the details about our subscription offers in this brochure: Subscription Brochure. For more information on GLPI Network Cloud, visit our site.
Join the Community
This plugin isn’t just a tool; it’s a community effort. We invite you to test it, provide feedback, and help us refine it to better serve your needs.
Stay connected, stay informed, and elevate your work experience with the “Branding” plugin. We’re here to make sure you’re always in the loop, no matter where your work takes you.
Video content
00:00 Intro
00:31 Installing the ‘Branding’ Plugin
01:23 Setting up the ‘Branding’ Plugin
03:47 How to set up a different branding to different entities
