We would like to share with you that our partner INFOTEL in France is now a PLATINUM partner!
GLPI Expert Company since 2006, Infotel has a savoir-faire on all phases of a project. We provide IT system audits, consulting and expertise, setup and integration of software and solutions. Infotel also offers specific plugin development, training and technical support.
We are excited that GLPI ITSM solution is becoming more and more represented all over the world and GLPI Network (our support offer for on-premises – get your IT Infrastructure secured) subscription service will be available for more customers through our new partners.
Our large partnership network is always open for new collaborations. If you are interested in representing one of our products in your country, get in touch with us: https://glpi-project.org/contact_us/
Being a partner means:
Having an a direct access to the Teclib´s tech expertise;
Get special discounts;
Access official support,
Obtaining many other tools which will help you to gain more customers and increase reputation on the market by adding open source ITSM to your portfolio.
If you’ve ever wanted to give your GLPI instance a unique touch by incorporating your logo and customizing the login page, you’re in for a treat. In this blog post and accompanying video tutorial, let’s walk through the first steps of using the Branding Plugin to elevate your GLPI experience — and your client’s too.
The Branding Plugin for GLPI is a powerful tool designed to enhance the visual appeal of your GLPI instance. It allows you to replace default logos with your own and create a more personalized login page without the need of copying and pasting files directly into the server’s folders.
This not only makes your GLPI instance visually distinctive, but also reinforces your organization’s brand identity.
ℹ️ The ‘Branding’ plugin is available for all the Basic GLPI Network subscribers and for all GLPI Network Cloud customers.
How to install the Branding Plugin
If you are, at least, a Basic GLPI Network Subscriber or a GLPI Cloud Network administrator, you can find the plugin named Branding on the Marketplace of your instance.
✅ The plugin is available for all Basic or above GLPI Network Subscribers and for all GLPI Network Cloud clients.
Step 1: In Setup > Plugins > Marketplace, search for Branding after choosing the Discover tab.
Step 2: Install and enable it.
Step 3: Click on the tool icon below the Uninstall button or navigate through Administration > Entities > Root entity and look for the Branding tab
How to change GLPI login and top left logos
Step 4: Choose the files you want to replace the current ones.
Top Left corner logo – This can be changed according to the desired entity
Default size: 100×55 pixels
It is the logo you see when your GLPI page is opened and the left sidebar is expanded.
Lop Left corner logo (collapsed sidebar) – This can be changed according to the desired entity
Default size 40×40 pixels
It is the logo you see when your GLPI page is opened and the left sidebar is collapsed.
Favicon
Default size: 16×16 or 32×32 pixels
It is the logo you see next to the page title at the beginning of your browser’s the tab.
Login page logo
Default size: 220×130 pixels
It is the logo you see before you log in. It appears with the fields to fill with your username and password
Login page background
Default size: It depends on the usual size of your screens. The bigger, the better. (Make sure not to surpass the maximum upload limit for files.
It is the image you can add as a background at the login page.
Getting Started
Getting started with “Branding” is easy. You’ll find detailed documentation here: Plugin Documentation. Plus, you can explore this plugin in action on your GLPI Network Cloud demo instance.
This plugin is available via our professional offers ! From the level “Basic” in GLPI Network Subscriptions (on-premise), and to all of our GLPI Network Cloud customers.
Subscription and More Information
Find all the details about our subscription offers in this brochure: Subscription Brochure. For more information on GLPI Network Cloud, visit our site.
Join the Community
This plugin isn’t just a tool; it’s a community effort. We invite you to test it, provide feedback, and help us refine it to better serve your needs.
Stay connected, stay informed, and elevate your work experience with the “Branding” plugin. We’re here to make sure you’re always in the loop, no matter where your work takes you.
Video content
00:00 Intro
00:31 Installing the ‘Branding’ Plugin
01:23 Setting up the ‘Branding’ Plugin
03:47 How to set up a different branding to different entities
The year 2023 is coming to a close! This year has been marked by numerous exciting developments for Teclib’ and GLPI, and we’re thrilled to share the highlights with you.
Every year, we offer you a recap of GLPI. Our E-Report 2023 is now available, and you can download it today.
What will you find in this Annual Report?
Celebration of GLPI’s 20th anniversary;
Overview of GLPI 2023: global partnerships, new users, downloads, cloud instances, new plugins;
Users about GLPI (discover what they appreciate!);
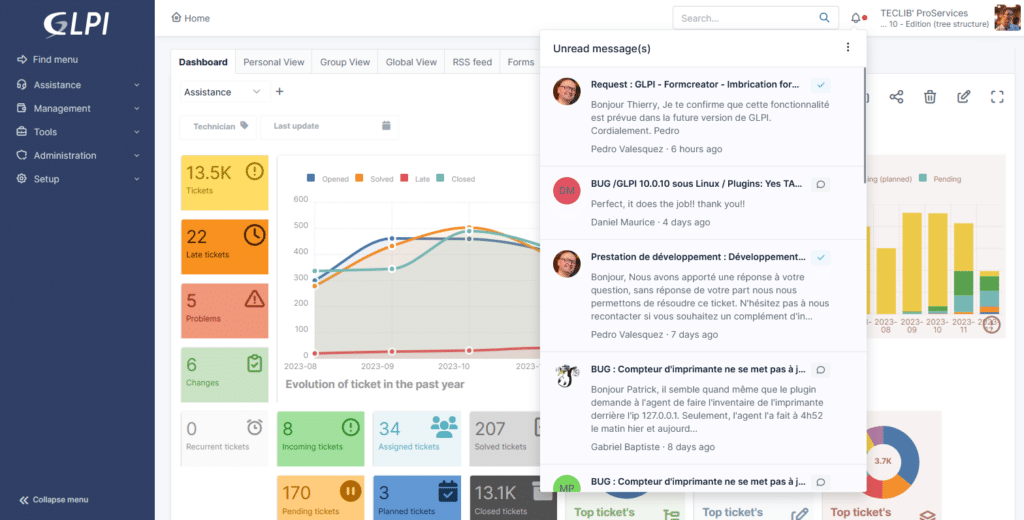
This plugin helps you to keep track of unread messages while you were offline and don’t want to miss ant messages that could have be sent, and you should be aware of.
Notification bell
The plugin adds a new notification bell in the top right corner so you can keep track of everything you need to. This notification bell list all your unread messages.
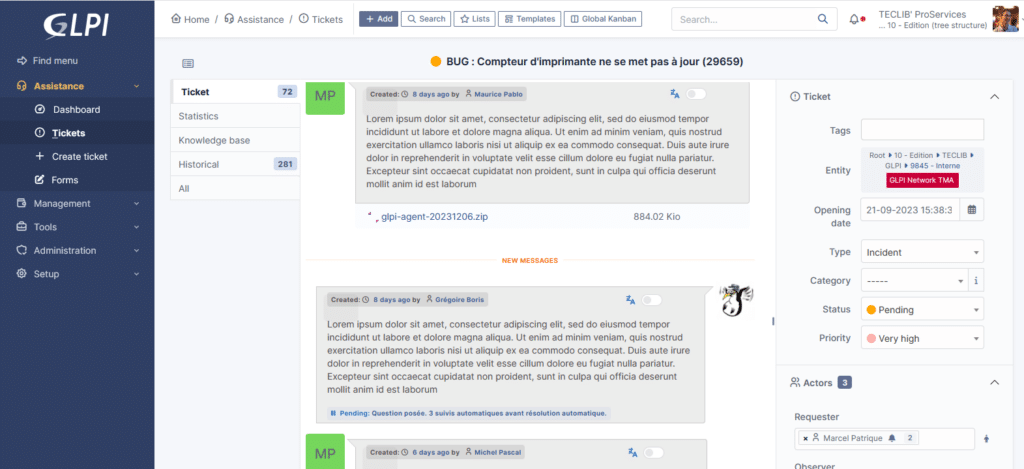
Timeline indicator
The timeline indicator adds a line below the last item you have read on THE tickets’ timeline. So now it’s possible to come back to work knowing exactly where you stopped before.
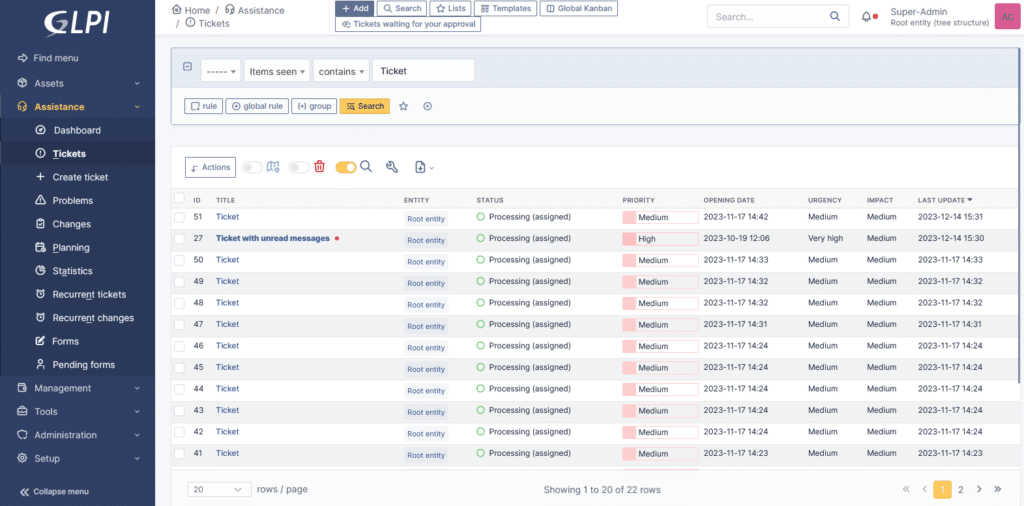
List indicator
When you open the ticket list, all the tickets with unread messages are highlighted, and you can choose the one you want to know more about.
You will find below the list of security issues fixed in this bugfixes version:
Authenticated SQL Injection (CVE-2023-43813)
SQL injection through inventory agent request (CVE-2023-46727)
Remote code execution from LDAP server configuration form on PHP 7.4 (CVE-2023-46726)
On this last point, we wanted to recall the 7.4 version of PHP is very outdated and not supported anymore by the developers! You should upgrade on a recent version, at least 8.2 (8.0 will be outdated at the end of the year and 8.1 will be only with security fixes).
Also, here is a short list of main changes done in this version:
Enhance pending reasons display
various LDAP fixes (timeout, location import, deletion/restoration scenarios)
several inventory fixes (unmanaged assets reconciliation, rules for phones, rules logs for discovery, Cisco stacks, removal of remote management)
several performance enhancements (defer entity tree loading, strong enhancement on actors loading, all assets query execution time, web cron removal, dual ajax call for tab loading)
highlights of security requirements on install/update page. Some options like PHP versions, web folder setup are suggested with a strong visual.
We use cookies to ensure that we give you the best experience on our website. If you continue to use this site we will assume that you are happy with it.